
Our home wiring panel was getting overrun with equipment with no place to put them and limited space to actually mount a shelf. First, there were 2 boxes from Comcast for our phone system and internet connection. Then I added two Apple Time Capsules to create our wireless network with a total of 4 TB of backup disk drive space. Where could I safely put all these boxes?
I searched for pre-built brackets and shelves for the Time Capsule or Mac Mini and found a few. They were all specialized and not cheap (most cost around $45). Some required a lot of wall space. I devised a simple solution with the following advantages:
- Very low cost (about $5 per shelf)
- Easy to construct and install
- Access to front and back of the unit for viewing status lights and attaching cables
- Sturdy and reliable
- Open air provides breathability for the components so they don’t overheat
- Fits any equipment
- Minimal wall space required for installation
- Side stops prevent units from accidentally falling off the side of the shelf.
Note: This shelf is not a solution for keeping a component secure or preventing use of the internal CD drive as some of the pre-built solutions do.
I was able to get all the parts at our local Menard’s hardware store. Lowe’s and Home Depot should also carry similar items. I’ve included links here so you could purchase from Amazon.com.
Gather the following components:
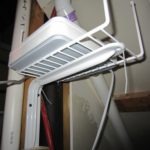
- 1 Shelf bracket with 10″ arm
- 1 Small wire helper shelf
- 3 Standard screws
- 3 Plastic cable zip ties
Amazon.com Links
- Mintcraft 8″ White Magnum Shelf Bracket 25220PHL $2.29 or Stanley S830-844 10 By 12 Inch 2 Shelf Brackets Set $1.87
- Grayline Small Helper Shelf approximately 10.5″x5″ or Grayline Small Bath Helper ShelfAmazon sells for $4.79 but found at local hardware store for $2.50
- Grip-Rite 158CDWS1 1-5/8-Inch 6 Coarse Thread Drywall Screw with Bugle Head, 1 Pound $7.83
- 4″ Plastic Cable Zip Ties (100 pack) $4.39
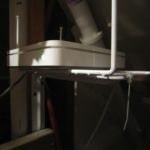
Here’s how you build and install the shelf in three easy steps:
- Use three screws to mount the shelf bracket on the wall. You may want to install the bracket upside down so that the longer arm is facing out. It will still be plenty sturdy. (If installing in drywall with no stud be sure to use appropriate dry-wall anchors.)
- Turn the helper shelf upside down so the legs face up (they will become side stops) and place the shelf on top of the bracket.
- Use three cable zip ties to fasten the shelf to the bracket going through the screw holes in the bracket.
You’re all done! Hope works for you. It worked out perfect for me. Repurposing the shelf and mounting it upside down with the cable zip ties was the key. You should also have plenty of zip ties left over to also make your cables neat!


Tim Cimbura – CEO, CFO and Solution Engineer
Tim is an expert in creating custom business solutions that make businesses more effective, productive, and profitable. He specializes in rapid application development with Claris FileMaker, Laravel, and WordPress. He also knows Apple macOS technology inside and out.